In this tutorial, you'll build a complete AI phone assistant for your dental practice that:
Answers common patient questions (hours, services, insurance, pricing)
Looks up patient information and upcoming appointments
Books and reschedules appointments directly in Open Dental
Transfers complex requests to your front desk staff
Works 24/7, even when your office is closed
Time to complete: 30-45 minutes
Technical skill required: None (if you can use Open Dental, you can do this)
What you'll need: VoiceInfra account, phone number, Open Dental API access
The Problem: Your Front Desk is Overwhelmed
If you run a dental practice, this scenario is painfully familiar:
It's Tuesday at 9:30 AM. Your hygienist is running behind, a patient just arrived early, and your front desk phone is ringing off the hook. Your receptionist is juggling:
A patient checking in
Another patient is asking about insurance coverage
A new patient is calling to schedule their first cleaning
Someone is calling to reschedule because they're stuck in traffic
What happens? Calls go to voicemail. Patients get frustrated. Appointments don't get booked. Revenue walks out the door.
The numbers don't lie:
An average dental practice receives 50-100 calls per day
30% of calls go to voicemail during busy hours
Each missed call = potential $200-500 in lost revenue
Front desk staff spend 60-70% of their time on the phone
You've probably thought about hiring another receptionist, but that's $35,000-45,000 per year, plus benefits. And they still can't answer calls at 7 PM when a patient has a dental emergency.
There's a better way.
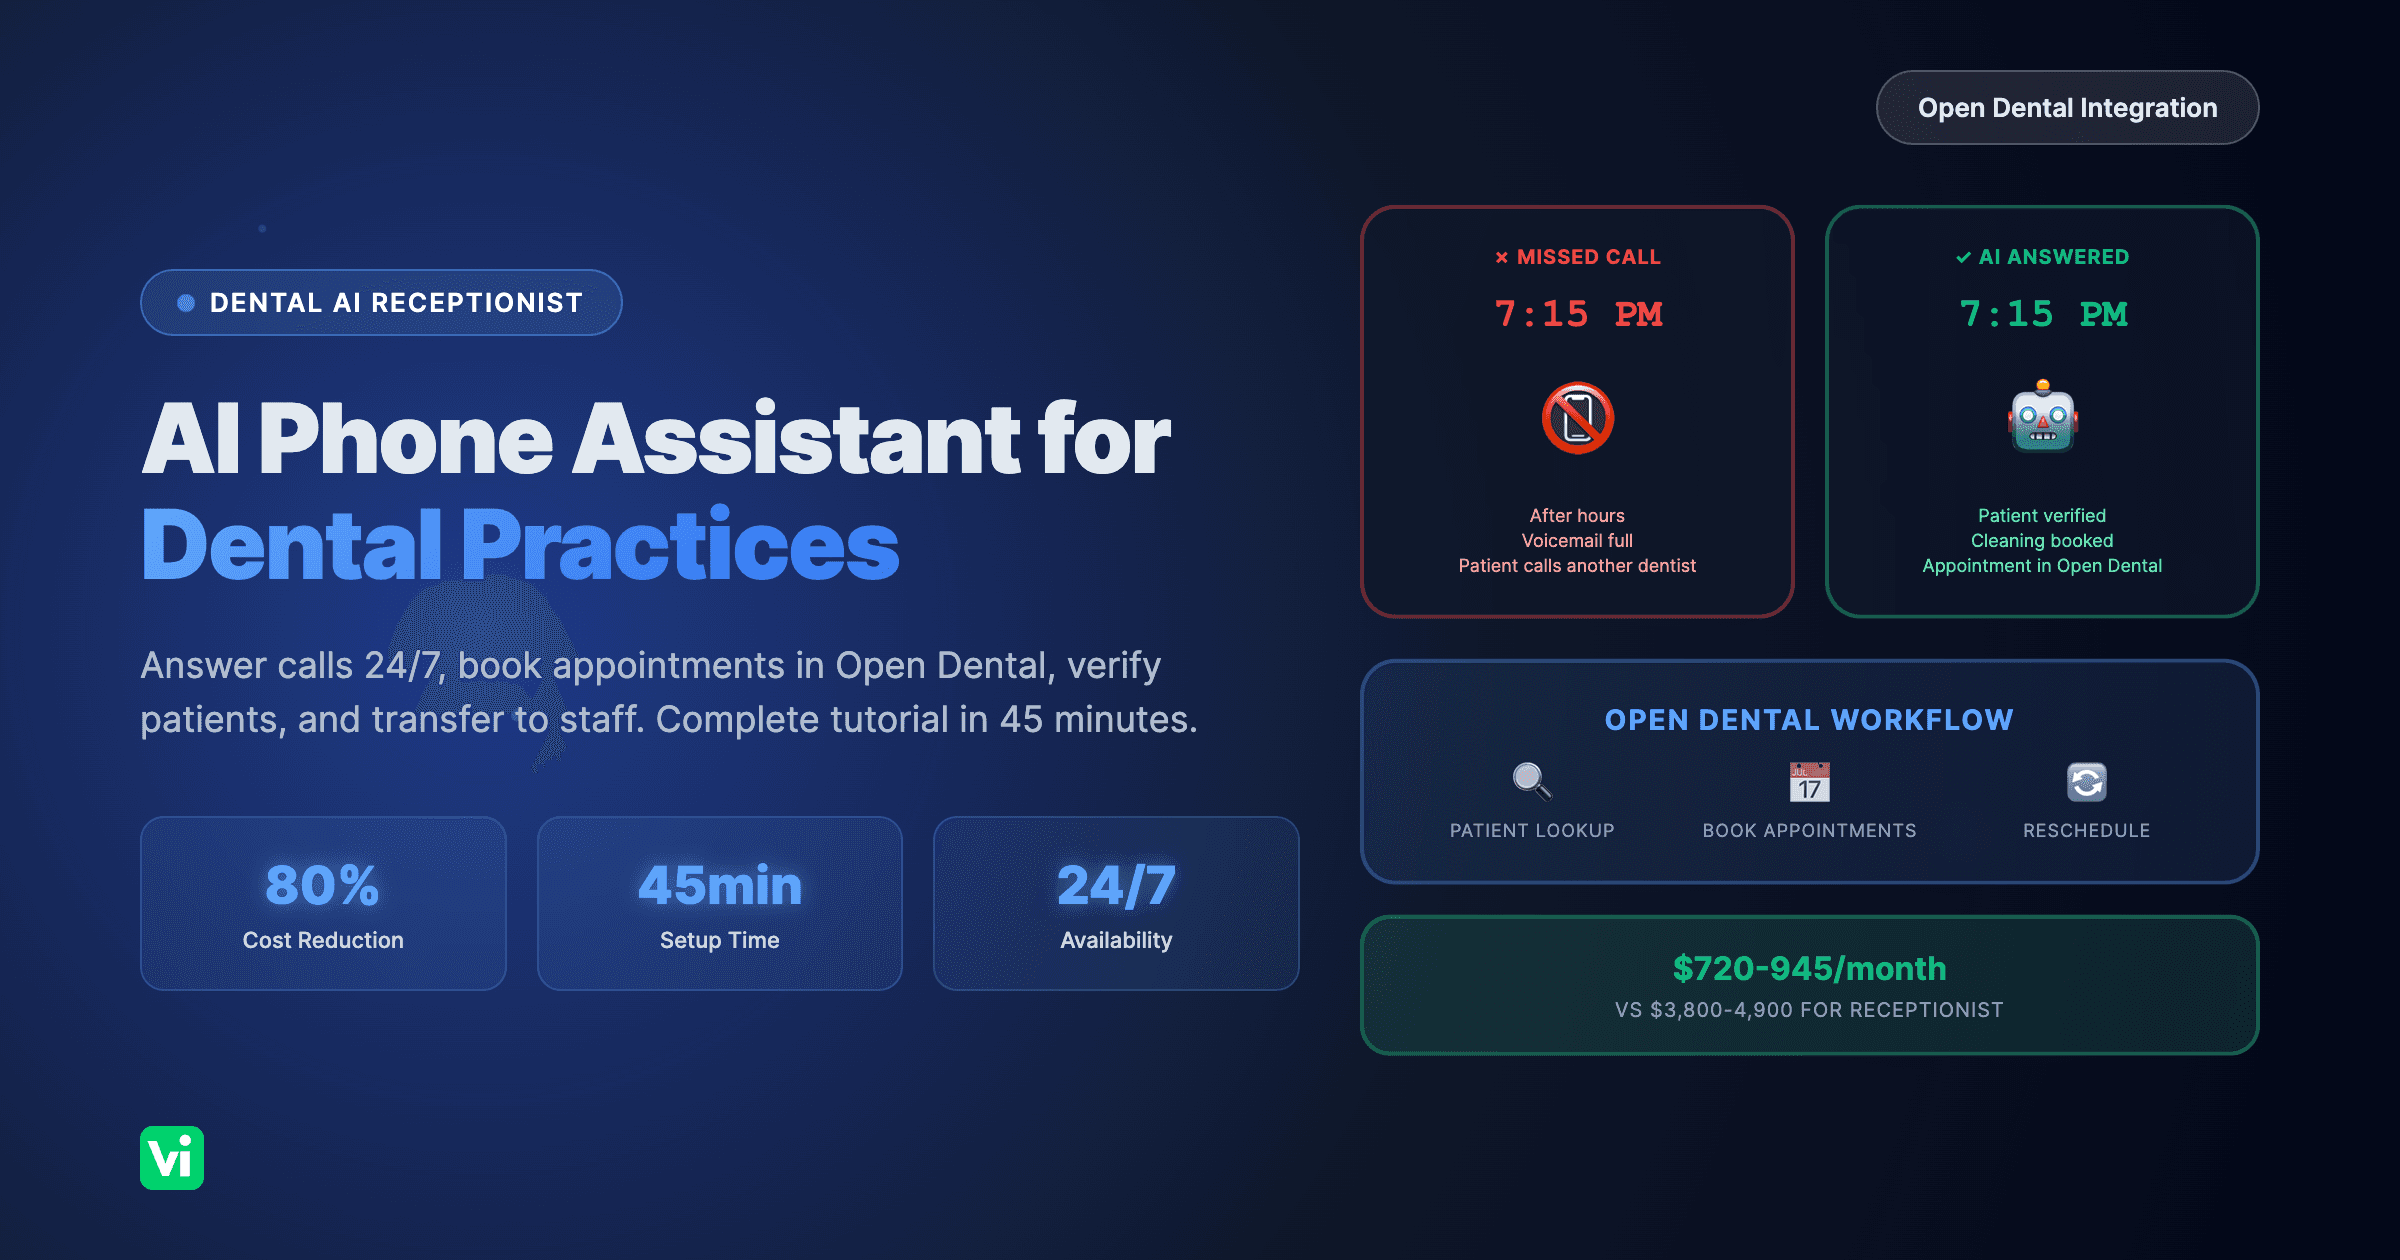
What You're Going to Build
By the end of this tutorial, you'll have a fully functional AI phone assistant that handles your dental practice calls like a trained receptionist.

AI agent handing dental practice customer calls
Your AI assistant will:
✅ Answer FAQs instantly - Office hours, accepted insurance, services offered, pre-appointment instructions
✅ Verify patient identity - Look up patients by phone number or name in Open Dental
✅ Check appointments - "You have a cleaning scheduled for Thursday at 2 PM with Dr. Smith."
✅ Book new appointments - Find available slots and schedule directly in Open Dental
✅ Reschedule appointments - Move appointments to new times
✅ Transfer intelligently - Send complex billing or clinical questions to staff with full context
✅ Work 24/7 - Answer calls after hours, weekends, holidays
Prerequisites: What You Need Before Starting
Before we begin, make sure you have:
1. VoiceInfra Account
Sign up at voiceinfra.ai (free trial available)
You'll need access to the dashboard
2. Phone System
Choose one of these options:
Option A: Existing PBX system (3CX, Yeastar, FreePBX, Asterisk, etc.) - RECOMMENDED
Option B: Twilio or another SIP provider with an existing phone number
Option C: WhatsApp Business account (optional - for WhatsApp calling)
3. Open Dental API Access
Open Dental version 21.1 or higher (for API support)
API is enabled in your Open Dental installation
API key (refer to Open Dental documentation for setup)
Your Open Dental database is accessible via the API endpoint
4. Practice Information Ready
Gather this information (you'll need it):
Office hours
Services you offer (cleanings, exams, fillings, crowns, etc.)
Insurance plans you accept
Pricing for common procedures
Pre-appointment instructions (fasting, medications, etc.)
Front desk phone number for transfers
5. 30-45 Minutes of Time
Grab a coffee ☕
Close Slack
Let's build this thing
Tutorial Overview: 9 Steps to Your AI Receptionist
Here's what we're going to do:
Phase 1: Create the AI Agent (15 minutes)
Step 1: Create your AI agent in VoiceInfra
Step 2: Configure personality and behavior for the dental context
Step 3: Add a knowledge base with your practice FAQs
Phase 2: Connect to Open Dental (20 minutes)
Step 4: Set up the patient lookup function
Step 5: Configure appointment booking integration
Step 6: Test the Open Dental connection
Phase 3: Finalize & Deploy (10 minutes)
Step 7: Set up call transfers to the front desk
Step 8: Connect your phone number
Step 9: Test everything and go live
Let's get started! 🚀
Step 1: Create Your AI Agent (5 minutes)
First, we'll create the AI agent using VoiceInfra's AI Agent Builder - a guided questionnaire that helps you build agents without any coding.
1.1 Log in to VoiceInfra Dashboard
Go to portal.voiceinfra.ai and log in.
1.2 Open AI Agent Builder
Click "Agents" in the left sidebar
Click the "Create New Assistant" button
You'll see two options:
"Create New Assistant" - Manual configuration
AI Builder icon - Guided builder ✨
Click the AI Builder icon on the right
Why use the AI Agent Builder?
No technical knowledge required
Guided step-by-step process
Auto-generates system prompts
Configures best practices automatically
Takes 5 minutes vs 30 minutes manual setup
1.3 Fill Out the AI Agent Builder Questionnaire
The builder will guide you through a simple questionnaire. Here's what to enter:
Step 1: Define Your Agent
Agent Name:
Dental Front Desk Assistant
Call Type:
Select "Inbound" (patients calling your office)
Industry:
Select "Healthcare" from the dropdown
Things the agent SHOULD do: Click "+" to add each item:
Answer questions about office hours, location, and servicesLook up patient information by phone number or nameSchedule new appointments for cleanings and checkupsReschedule or cancel existing appointmentsTransfer complex questions to front desk staff
Things the agent SHOULD NOT do: Click "+" to add each item:
Provide medical advice or diagnose conditionsDiscuss specific treatment costs without verificationMake up information about procedures or policiesBook emergency appointments without staff approval
Key Objectives:
Help dental practice patients schedule appointments and get basic information when the front desk is busy
What happens behind the scenes:
VoiceInfra automatically generates a professional system prompt based on your answers
Selects optimal voice model (OpenAI Realtime) for healthcare
Configures conversation settings for natural phone interactions
Sets up best practices for dental office scenarios
Step 2: Review & Create
Review your configuration summary
You'll see:
Agent name and call type
Industry (Healthcare)
Model: OpenAI Realtime (Voice: alloy)
Auto-generated system prompt preview
Click "Create Agent"
Why this works:
✅ No need to write complex system prompts
✅ Industry-specific best practices built in
✅ Professional voice and tone automatically configured
✅ Takes 2 minutes instead of 20 minutes
✅ Checkpoint: Your agent is now created! You'll be taken to the agent details page.
Step 2: Customize Your Agent (Optional - 5 minutes)
The AI Agent Builder has already created a professional system prompt for you, but you can customize it if needed.
2.1 Navigate to Model Tab
In your agent details page:
Click the "Model" tab
Scroll to the "System Prompt" section
2.2 Review Auto-Generated System Prompt
VoiceInfra has automatically created a system prompt based on your questionnaire answers. It will look something like this:
You are the AI receptionist for Dental Front Desk Assistant.

YOUR ROLE:
You handle inbound calls professionally and help patients with:
- Answer questions about office hours, location, and services
- Look up patient information by phone number or name
- Schedule new appointments for cleanings and checkups
- Reschedule or cancel existing appointments
- Transfer complex questions to front desk staff

IMPORTANT - THINGS YOU SHOULD DO:
✓ Answer questions about office hours, location, and services
✓ Look up patient information by phone number or name
✓ Schedule new appointments for cleanings and checkups
✓ Reschedule or cancel existing appointments
✓ Transfer complex questions to front desk staff

IMPORTANT - THINGS YOU SHOULD NOT DO:
✗ Provide medical advice or diagnose conditions
✗ Discuss specific treatment costs without verification
✗ Make up information about procedures or policies
✗ Book emergency appointments without staff approval

CONVERSATION GUIDELINES:
- Speak naturally and conversationally
- Be warm, professional, and empathetic
- Keep responses concise (2-3 sentences)
- Confirm important details before finalizing
- If unsure, offer to transfer to staff.

KEY OBJECTIVE:
Help dental practice patients schedule appointments and get basic information when the front desk is busy.
2.3 Customize the Prompt (Optional)
Want to add practice-specific details?
You can edit the prompt to include:
Your practice name and location
8 AM Office hours (e.g., "Monday-Friday 8 AM - 5 PM")
Dentist names (e.g., "Dr. Smith and Dr. Johnson")
Specific services offered
Insurance information
Just edit the prompt and click "Save".
Pro Tip: The auto-generated prompt is already optimized for natural conversations. Only customize if you need to add specific details about your practice.
2.4 Set Call Behavior
Scroll to "Call Settings":
Max Call Duration:10 minutes
Response Timeout:5 seconds
End Call Phrases: Add these:
"Thank you for calling, goodbye."
"Have a great day."
"We'll see you at your appointment."
Background Audio: Select "Office Ambience" (optional - adds subtle background noise)
Click "Save Changes"
✅ Checkpoint: Your AI now knows how to behave like a dental receptionist!
Step 3: Add Knowledge Base for FAQs (10 minutes)
Now we'll upload your practice information so the AI can answer common questions.
3.1 Create Your FAQ Document
Open a text editor and create a document with your practice FAQs. Here's a template:
DENTAL PRACTICE FAQ - [Your Practice Name]

OFFICE HOURS:
Monday: 8:00 AM - 5:00 PM
Tuesday: 8:00 AM - 5:00 PM
Wednesday: 8:00 AM - 5:00 PM
Thursday: 8:00 AM - 5:00 PM
Friday: 8:00 AM - 3:00 PM
Saturday: Closed
Sunday: Closed

Emergency Contact: Call (555) 123-4567 for after-hours emergencies

LOCATION:
123 Main Street, Suite 200
Anytown, ST 12345
Parking available in rear lot

SERVICES WE OFFER:
- Routine Cleanings & Exams
- Digital X-Rays
- Fillings (composite and amalgam)
- Crowns & Bridges
- Root Canal Therapy
- Tooth Extractions
- Teeth Whitening
- Dental Implants
- Invisalign Clear Aligners
- Emergency Dental Care

INSURANCE:
We accept most major dental insurance plans including:
- Delta Dental
- MetLife
- Cigna
- Aetna
- Blue Cross Blue Shield
- United Healthcare

We are in-network with Delta Dental and MetLife.
For other plans, we file claims as an out-of-network provider.

PAYMENT OPTIONS:
- Cash, Check, Credit/Debit Cards
- CareCredit financing available
- Payment plans for treatments over $500

PRICING (without insurance):
- New Patient Exam + Cleaning + X-Rays: $250
- Routine Cleaning: $120
- Composite Filling: $180-250
- Crown: $1,200
- Root Canal: $800-1,200
- Teeth Whitening: $400

NEW PATIENT INFORMATION:
Please arrive 15 minutes early to complete paperwork.
Bring:
- Photo ID
- Insurance card
- List of current medications
- Medical history information

BEFORE YOUR APPOINTMENT:
- Brush and floss before your visit
- Eat a light meal (you may be numb after treatment)
- Take any prescribed pre-medication 1 hour before
- Inform us of any changes to medications or health conditions

CANCELLATION POLICY:
Please provide 24 hours notice for cancellations.
Late cancellations may incur a $50 fee.

EMERGENCY CARE:
We offer same-day emergency appointments for:
- Severe toothache
- Broken or knocked-out tooth
- Abscess or swelling
- Lost filling or crown

Call immediately if you have a dental emergency.
Save this as dental-practice-faq.txt or .pdf
3.2 Upload to Knowledge Base
In the VoiceInfra dashboard, click "Knowledge Base" in the left sidebar
Click "Upload Document"
Select your FAQ file
Add a name:
Practice FAQsClick "Upload"
Wait for processing (usually 30-60 seconds). Status will change from "Processing" to "Completed".
3.3 Link Knowledge Base to Agent
Go back to your agent (click "Agents" → select your agent)
Click the "Model" tab
Scroll to the "Knowledge Base" section
Click "Link Documents"
Select "Practice FAQs"
Click "Save"
3.4 Test Knowledge Base
Let's make sure it works:
In agent details, click the "Test" button (top right)
Click the microphone icon or type: "What are your office hours?"
The AI should respond with your office hours from the FAQ
✅ Checkpoint: Your AI can now answer questions about your practice!
Step 4: Set Up Patient Lookup Function (15 minutes)
Now we'll connect your AI to Open Dental so it can look up patient information.
Visual: How Patient Lookup Works
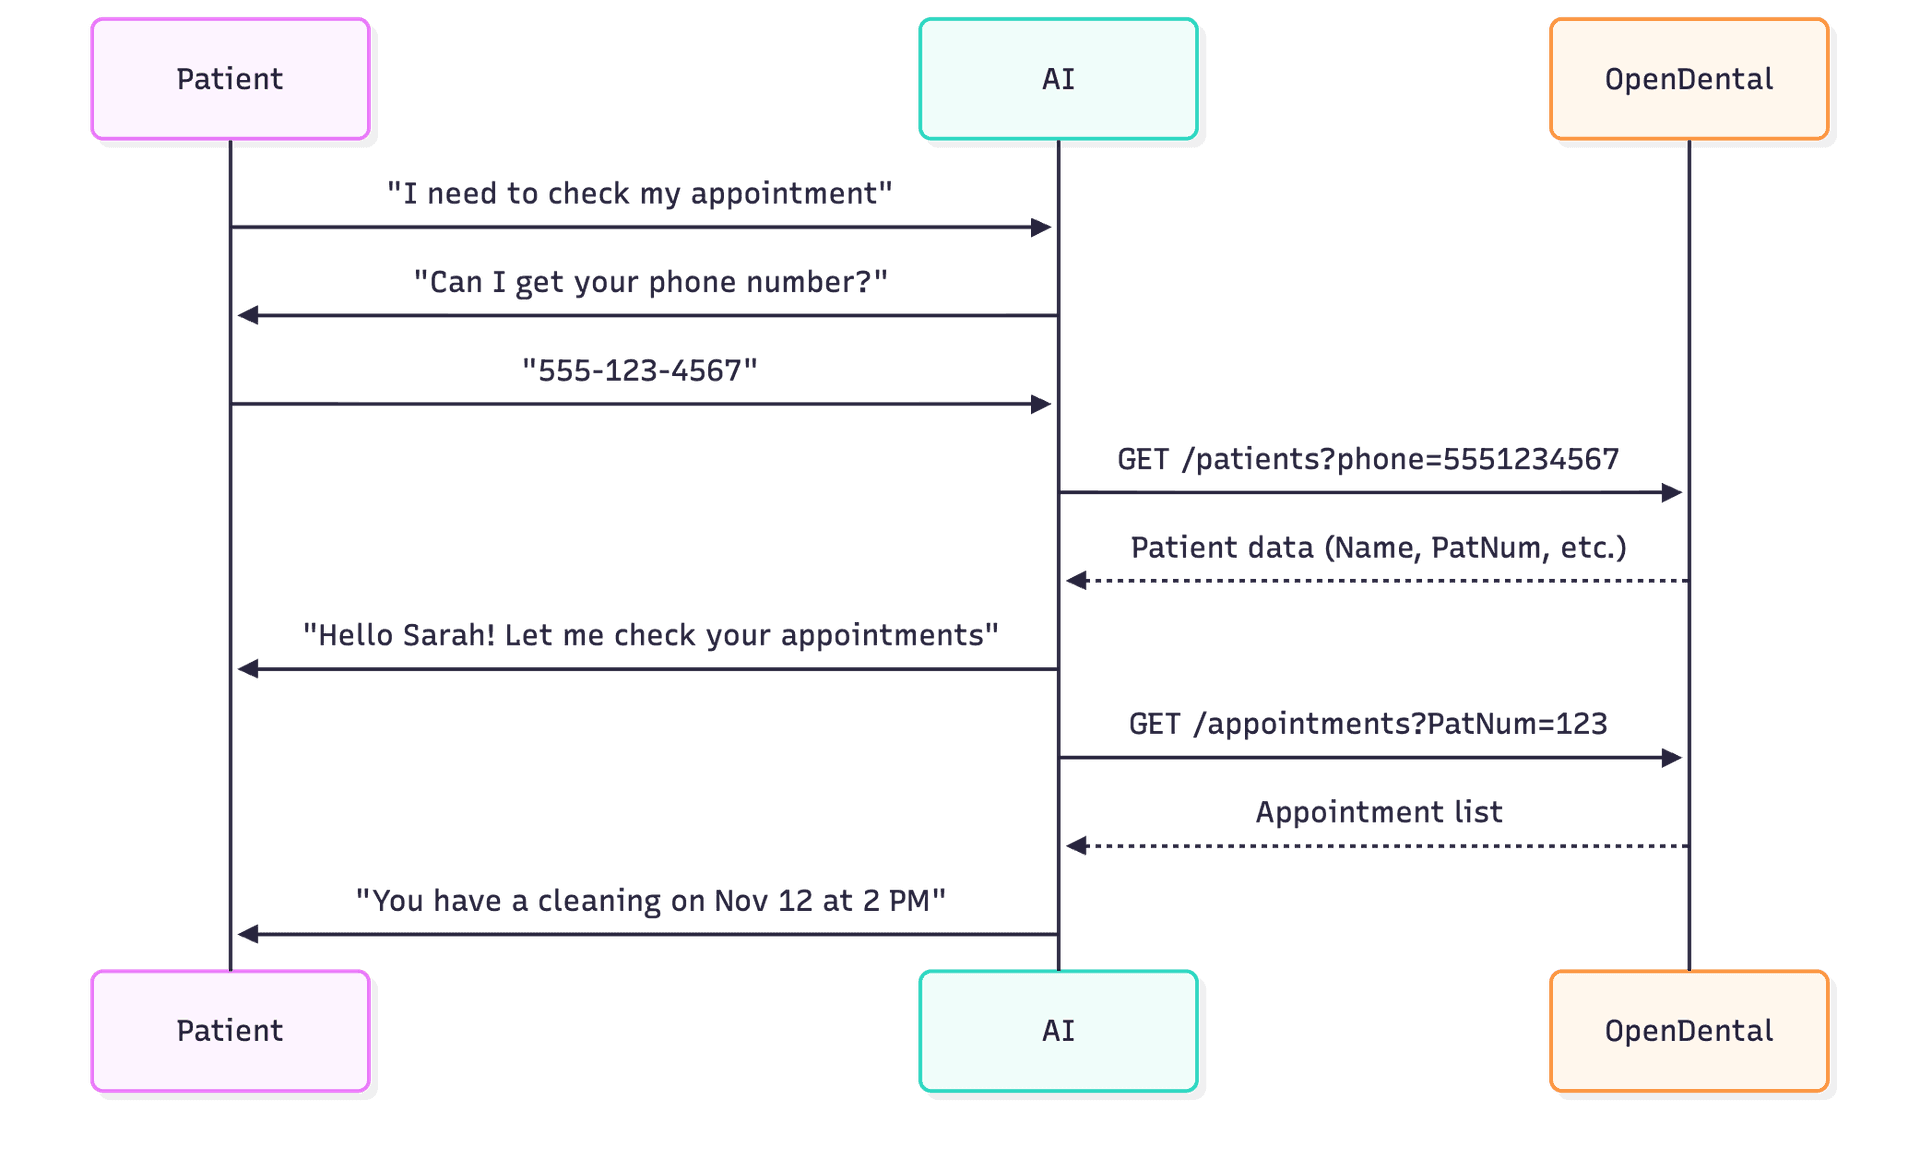
How patients lookup works
4.1 Get Your Open Dental API Credentials
You'll need to enable the API in Open Dental and get your API credentials. Refer to the Open Dental API documentation for detailed setup instructions.
You'll need:
API key with appropriate permissions (Read Patients, Read Appointments)
API endpoint URL (cloud or local server)
4.2 Create Patient Lookup Function Using CURL
VoiceInfra has a CURL API Function Creator that converts CURL commands into functions automatically. This is much faster than manual configuration!
Step 1: Get the CURL Command
Here's the CURL command for Open Dental patient lookup:
curl -X GET "https://api.opendental.com/api/v1/patients?phone=5551234567" \
  -H "Authorization: Bearer YOUR_OPENDENTAL_API_KEY_HERE" \
  -H "Content-Type: application/json"
Replace YOUR_OPENDENTAL_API_KEY_HERE with your actual API key from Step 4.1
Step 2: Use the CURL Function Creator
Back in VoiceInfra:
Click "Functions" in the left sidebar
Click "Create New Function"
You'll see a dialog with two options:
"Start from Scratch" - Manual configuration
"Import from CURL" - Paste CURL command ✨
Click "Import from CURL"
Step 3: Paste Your CURL Command
Paste the CURL command (with your API key) into the text box
Click "Parse CURL"
VoiceInfra automatically extracts:
✅ Function name:
get_patients✅ HTTP method:
GET✅ Server URL:
https://api.opendental.com/api/v1/patients✅ Headers: Authorization and Content-Type
✅ Query parameters:
phone(string, required)
Step 4: Customize Function Details
Now customize the auto-generated function:
Function Name: Change from get_patients to lookup_patient
Description:
Look up patient information by phone number. Returns patient name, ID, and appointment history.
Function Instructions (for AI):
Use this function to look up patient information when a caller provides their phone number.

When to use:
- Patient says "I'm calling about my appointment"
- Patient mentions they're an existing patient
- Patient provides their phone number

What to do with the response:
- Greet patient by name: "Hello [FirstName]!"
- Confirm identity: "Just to confirm, is your last name [LastName]?"
- If no patient found, offer to transfer to front desk for new patient registration
Click "Create Function"
Why use the CURL Function Creator?
⚡ 10x faster than manual configuration
✅ No typos in headers or parameters
✅ Automatically detects parameter types
✅ Works with any API (not just Open Dental)
4.3 Link Function to Agent
Go to "Agents" → Select your agent
Click the functions" tab
Click "Add Function"
Select "lookup_patient"
Click "Save"
4.4 Test Patient Lookup
Let's test it:
Click the "Test" button in the agent details
Say or type: "Hi, I need to check my appointment. My phone number is 555-123-4567."
The AI should:
Call the lookup function
Greet you by name
Confirm your identity
Troubleshooting:
"API Error": Check your API key is correct
"Patient not found": Make sure the phone number exists in Open Dental
"Connection timeout": Verify your API endpoint URL is correct and accessible
✅ Checkpoint: Your AI can now look up patients in Open Dental!
Step 5: Configure Appointment Booking (15 minutes)
Now let's enable your AI to book and reschedule appointments directly in Open Dental.
Visual: Appointment Booking Flow
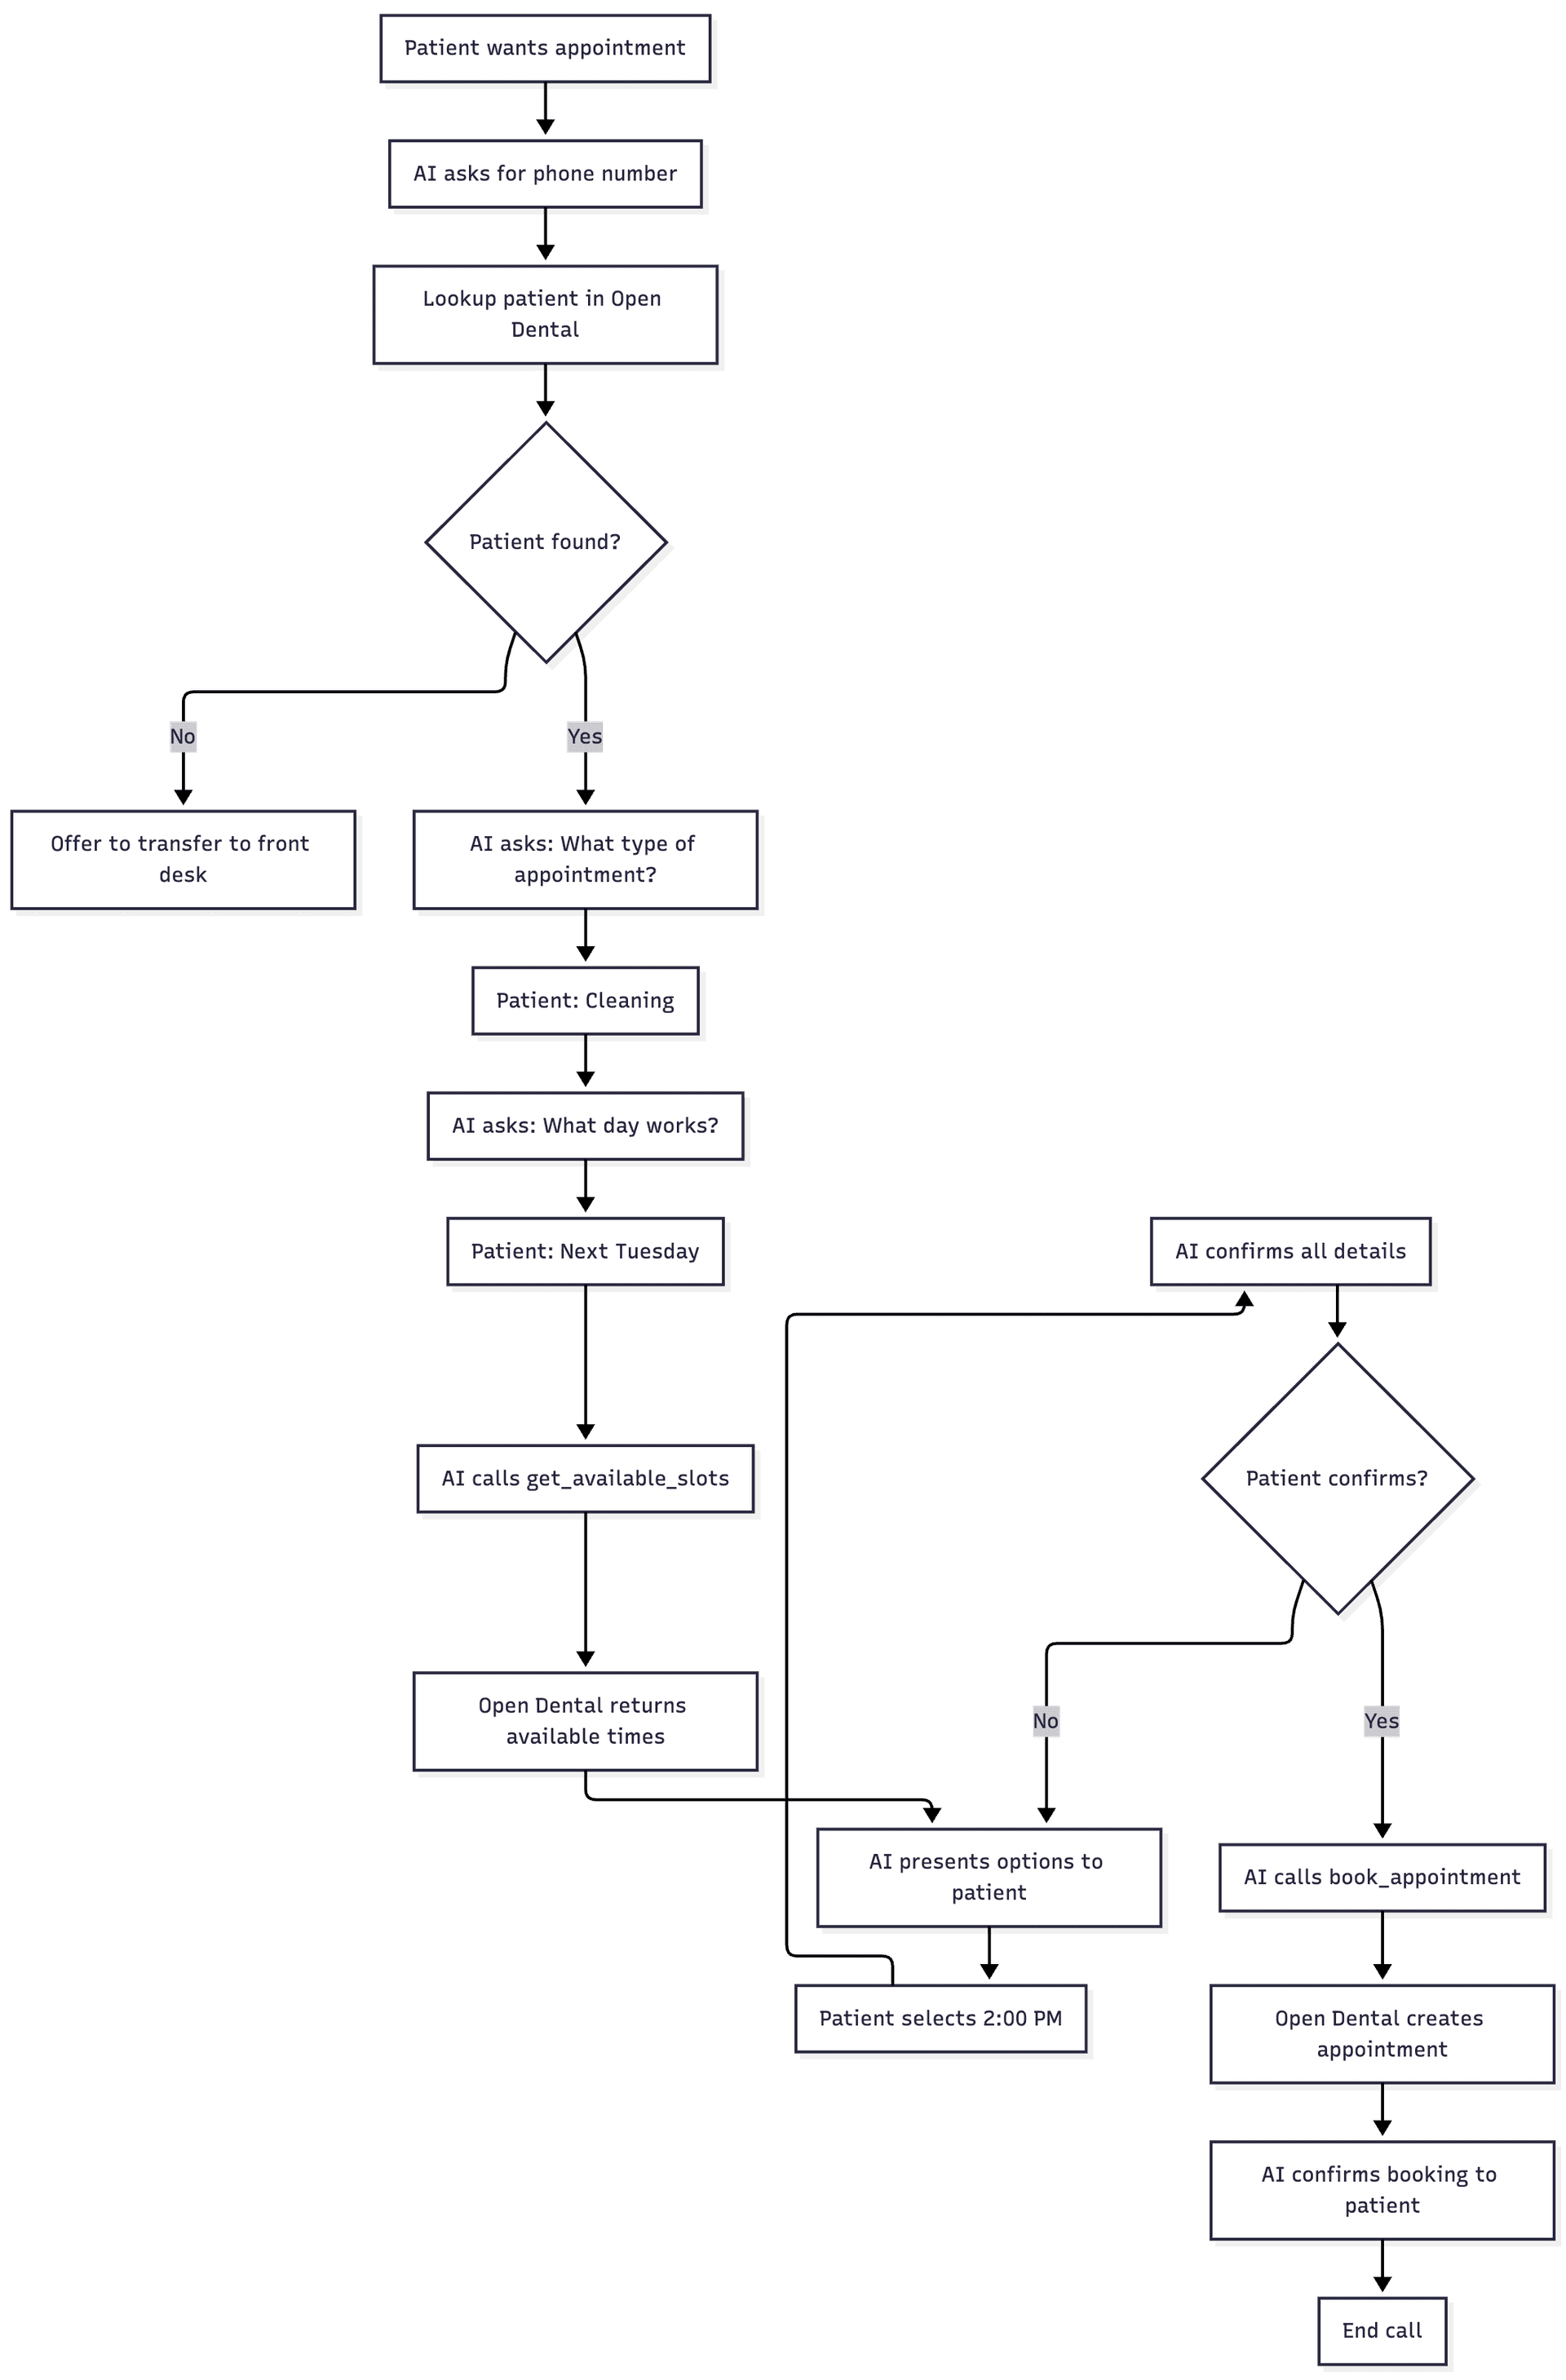
Patient wants appointment flow
5.1 Create Get Available Slots Function (Using CURL)
Let's use the CURL Function Creator again for the appointment slots function.
CURL Command:
curl -X GET "https://api.opendental.com/api/v1/appointments/Slots?date=2024-03-15&lengthMinutes=60" \
  -H "Authorization: Bearer YOUR_OPENDENTAL_API_KEY_HERE" \
  -H "Content-Type: application/json"
Steps:
Click "Functions" → "Create New Function"
Click "Import from CURL"
Paste the CURL command above (with your API key)
Click "Parse CURL"
VoiceInfra automatically detects:
✅ Function name:
get_appointments_slots✅ HTTP method:
GET✅ Server URL:
https://api.opendental.com/api/v1/appointments/Slots✅ Headers: Authorization and Content-Type
✅ Query parameters:
date(string),lengthMinutes(integer)
Customize:
Function Name: Change to get_available_slots
Description:
Get available appointment time slots from Open Dental for a specific date
Function Instructions:
Use this function to find available appointment times.

When to use:
- Patient wants to book a new appointment
- Patient wants to reschedule an existing appointment
- Patient asks, "What times do you have available?"

How to use:
1. Ask the patient what type of appointment (cleaning, exam, filling, etc.)
2. Ask for preferred date or date range
3. Call this function with the date
4. Present available times to the patient
5. Once the patient chooses, use the book_appointment function
Click "Create Function"
5.2 Create Book Appointment Function (Using CURL)
Now let's create the function to actually book appointments.
CURL Command:
curl -X POST "https://api.opendental.com/api/v1/appointments" \
  -H "Authorization: Bearer YOUR_OPENDENTAL_API_KEY_HERE" \
  -H "Content-Type: application/json" \
  -d '{
    "PatNum": 123,
    "AptDateTime": "2024-03-15 14:00:00",
    "Op": 1,
    "ProvNum": 5,
    "Pattern": "//XXXX//",
    "Note": "Regular cleaning"
  }'
Steps:
Click "Functions" → "Create New Function"
Click "Import from CURL"
Paste the CURL command above (with your API key)
Click "Parse CURL"
VoiceInfra automatically detects:
✅ Function name:
post_appointments✅ HTTP method:
POST✅ Server URL:
https://api.opendental.com/api/v1/appointments✅ Headers: Authorization and Content-Type
✅ Request body parameters:
PatNum,AptDateTime,Op,ProvNum,Pattern,Note✅ Parameter types: Integer, String, etc.
Customize:
Function Name: Change to book_appointment
Description:
Book a new appointment in Open Dental for an existing patient
Function Instructions:
Use this function to book an appointment after the patient has selected a time.

IMPORTANT: Always confirm these details before booking:
1. Patient name (from lookup)
2. Appointment type (cleaning, exam, etc.)
3. Date and time
4. Dentist/hygienist name

Steps:
1. Get patient info from lookup_patient
2. Get available slots from get_available_slots
3. Patient selects preferred time
4. CONFIRM all details with the patient
5. Call this function to book
6. Confirm booking with patient and provide appointment details
Click "Create Function"
5.3 Create Update Appointment Function (Using CURL)
For rescheduling existing appointments.
CURL Command:
curl -X PUT "https://api.opendental.com/api/v1/appointments/456" \
  -H "Authorization: Bearer YOUR_OPENDENTAL_API_KEY_HERE" \
  -H "Content-Type: application/json" \
  -d '{
    "AptDateTime": "2024-03-20 10:00:00",
    "Note": "Rescheduled by patient"
  }'
Steps:
Click "Functions" → "Create New Function"
Click "Import from CURL"
Paste the CURL command above
Click "Parse CURL"
VoiceInfra automatically detects:
✅ Function name:
put_appointments✅ HTTP method:
PUT✅ Server URL:
https://api.opendental.com/api/v1/appointments/{AptNum}✅ Path parameter:
AptNum(the456in the URL)✅ Request body:
AptDateTime,Note
Customize:
Function Name: Change to update_appointment
Description:
Reschedule or update an existing appointment in Open Dental
Function Instructions:
Use this function to reschedule an existing appointment.

Steps:
1. Look up patient to get their upcoming appointments
2. Confirm which appointment they want to reschedule
3. Get available slots for new date
4. Patient selects new time
5. CONFIRM old and new appointment details
6. Call this function to update
7. Confirm the change with patient
Click "Create Function"
🎉 You just created 3 API functions in under 5 minutes using CURL!
Without the CURL Function Creator, this would have taken 20-30 minutes of manual configuration.
5.4 Link All Functions to Agent
Go to your agent → "Functions" tab
Add all three functions:
lookup_patientget_available_slotsbook_appointmentupdate_appointment
Click "Save"
5.5 Test Appointment Booking Flow
Test the complete flow:
Click "Test" in the agent details
Simulate this conversation:
You: "Hi, I'd like to schedule a cleaning"
AI: "I'd be happy to help! Can I get your phone number?"
You: "555-123-4567"
AI: [Looks up patient] "Hello Sarah! What day works best for your cleaning?"
You: "Next Tuesday"
AI: [Gets available slots] "I have 9:00 AM, 10:30 AM, 2:00 PM, or 3:30 PM available. Which time works for you?"
You: "2:00 PM"
AI: [Confirms and books] "Perfect! Your cleaning is confirmed for Tuesday, November 12th at 2:00 PM with Dr. Smith."
✅ Checkpoint: Your AI can now book and reschedule appointments in Open Dental!
Step 6: Set Up Call Transfer to Front Desk (5 minutes)
For complex requests, your AI needs to transfer calls to your front desk staff.
Visual: Call Transfer Decision Tree
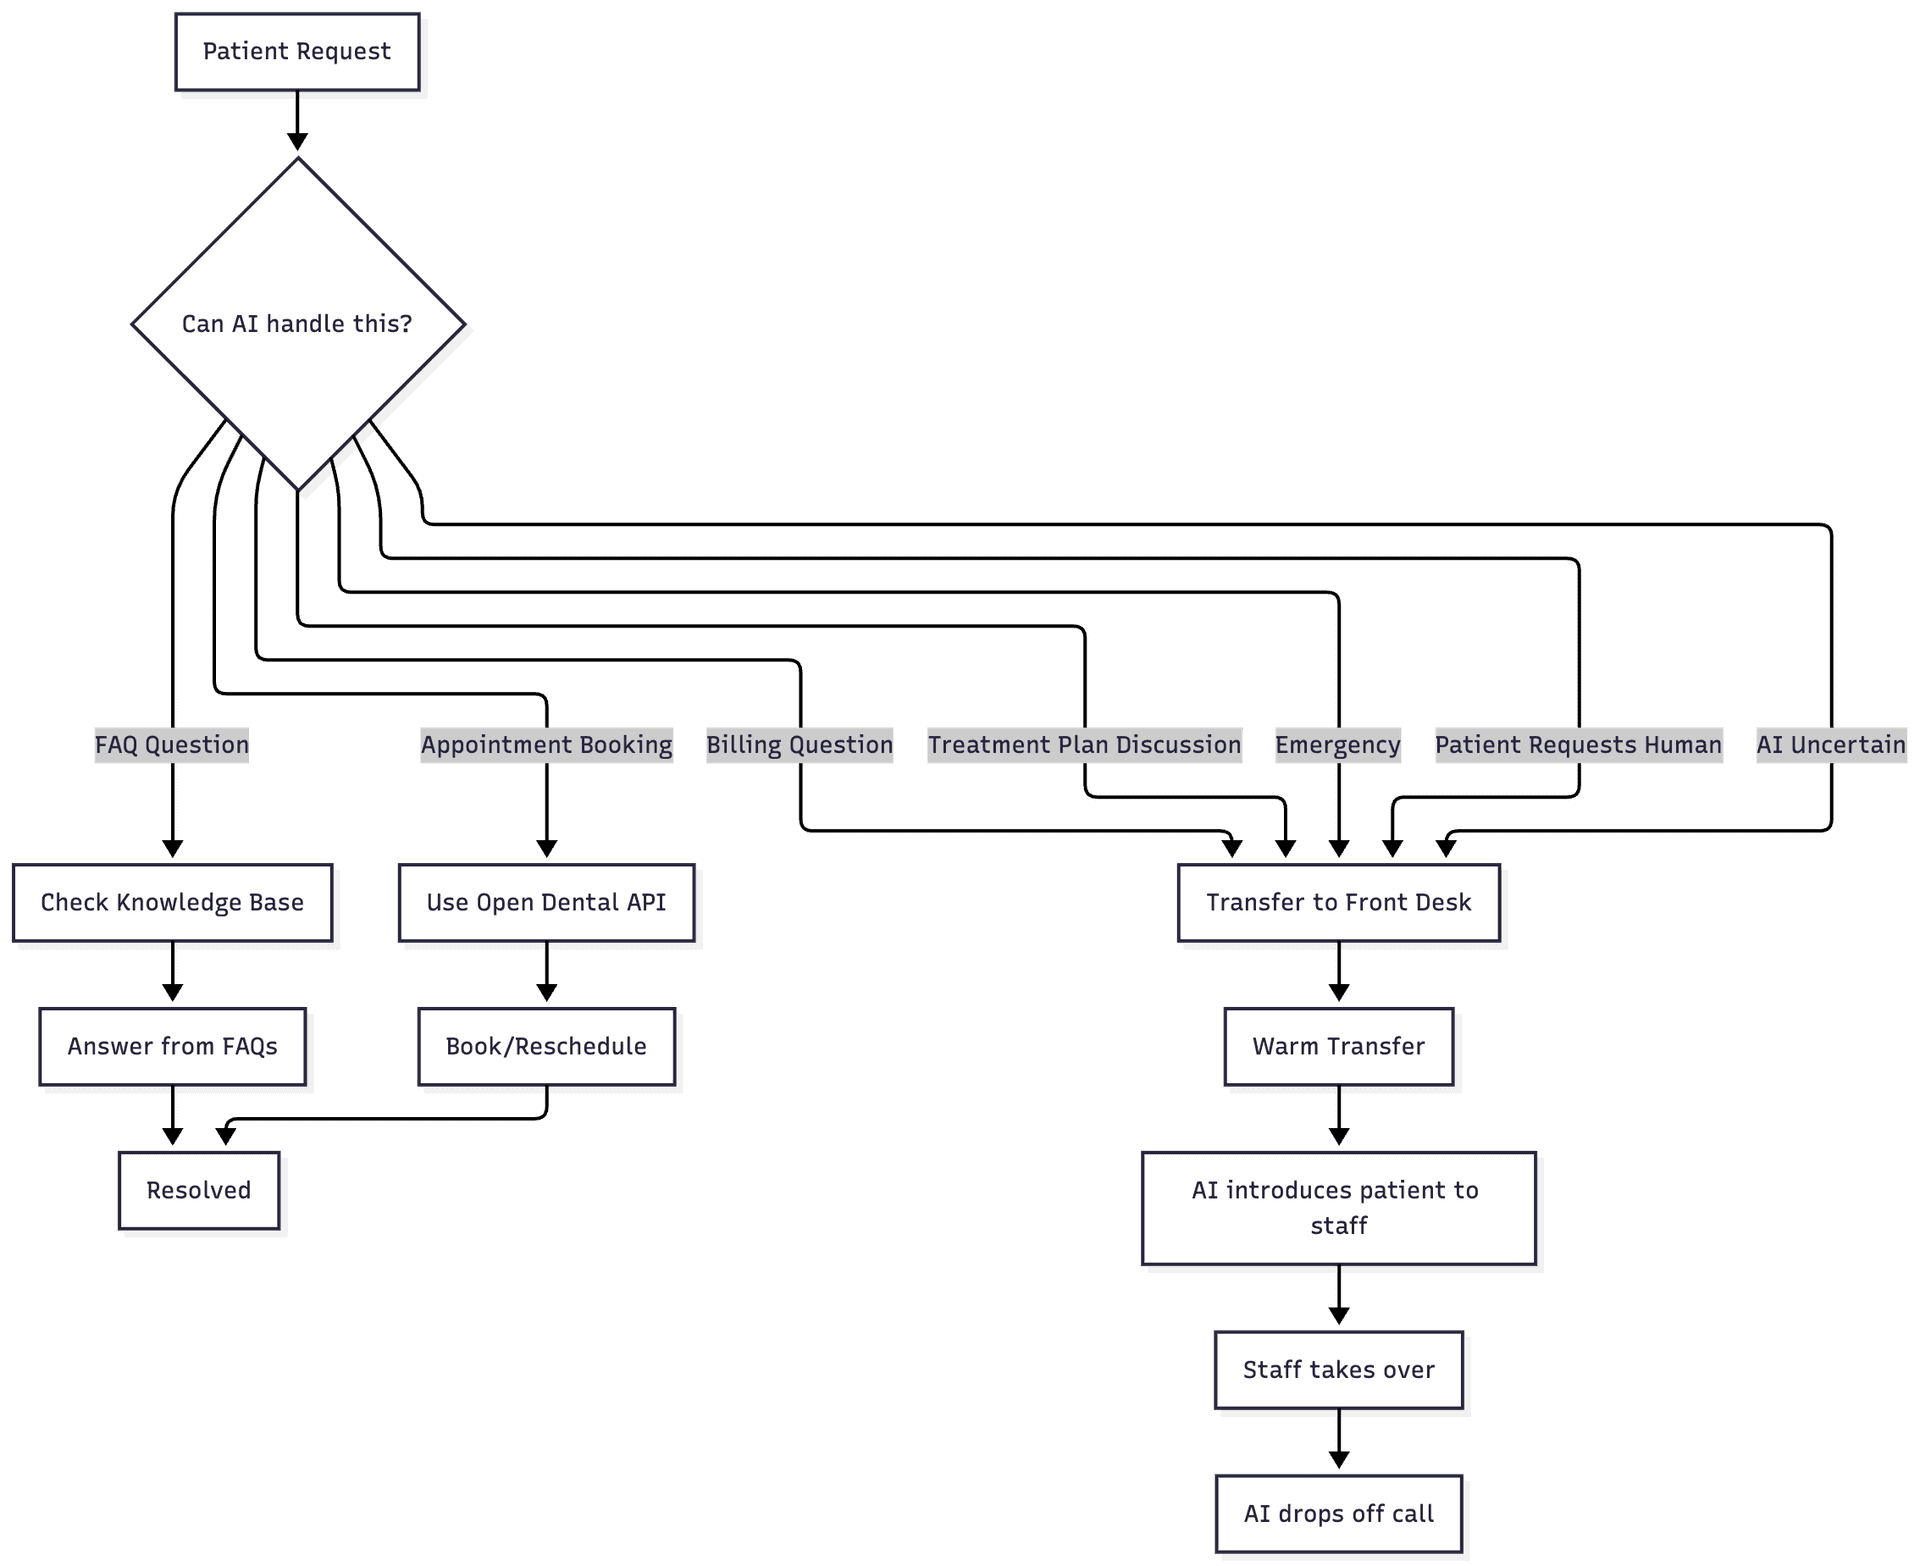
Set Up Call Transfer to Front Desk
6.1 Configure Call Transfer
Go to your agent → "Call Transfer" tab
Toggle "Enable Call Transfer" to ON
6.2 Add Transfer Numbers
Add your front desk phone numbers:
Primary Transfer Number:
Label:
Front DeskPhone Number:
+15551234567(your front desk number)Description:
Main reception desk
Secondary Transfer Number (optional):
Label:
Office ManagerPhone Number:
+15559876543Description:
For billing and complex issues
6.3 Choose Transfer Type
Transfer Type: Select "Warm Transfer"
Warm Transfer = AI stays on the line, introduces the patient to the staff, then drops off. Cold Transfer = AI immediately transfers without introduction
We recommend Warm Transfer for a better patient experience.
6.4 Set Transfer Message
Transfer Introduction Message:
I'm going to connect you with our front desk team, who can better assist you with that. Please hold for just a moment while I get them on the line.
Message to Staff (what staff hears when they pick up):
Hi, this is the AI assistant. I have [Patient Name] on the line regarding [reason for call]. Transferring now.
6.5 Configure DTMF Routing (Optional)
If you want patients to press numbers for different departments:
DTMF Mapping:
Press 1 → Front Desk (+15551234567)
Press 2 → Billing (+15559876543)
Press 3 → Emergency Line (+15551111111)
Click "Save Changes"
6.6 Test Call Transfer
Click "Test" in the agent details
Say: "I need to speak with someone about my bill."
AI should respond with a transfer message and initiate the transfer
✅ Checkpoint: Your AI can now transfer calls to your staff!
Step 7: Connect Your Phone System (10 minutes)
Now let's connect your AI assistant to your phone system so patients can actually call it.
7.1 Choose Your Connection Method
VoiceInfra gives you three flexible options (choose what works for your setup):
🏆 Option A: Register as PBX Extension (RECOMMENDED - 5 minutes)
Best for: Practices with existing PBX (3CX, Yeastar, Asterisk, FreeSWITCH, Avaya, etc.)
Why it's great: No new phone numbers needed, works with your existing system
Unique benefit: Transfer calls to other extensions, receive calls like any desk phone
Option B: Connect Existing Number (Twilio/Custom SIP - 5 minutes)
Best for: Practices with Twilio or other SIP providers
Why it's great: Use your existing phone number, simple webhook setup
Option C: WhatsApp Business (Bonus - 5 minutes)
Best for: Practices wanting WhatsApp call support
Why it's great: Patients can call via WhatsApp using SIP integration
7.2 Option A: Register as PBX Extension (RECOMMENDED)
This is VoiceInfra's killer feature - unlike other AI platforms that force you to buy new numbers and duplicate configurations, we register TO your existing PBX as an extension.
Why This Is Amazing:
✅ No new phone numbers needed - Use your existing office number
✅ Transfer to extensions - AI can transfer to ext. 102 (billing), ext. 103 (manager), etc.
✅ Receive calls like any phone - Route calls to an AI extension from your PBX
✅ Works with ANY PBX - 3CX, Yeastar, Asterisk, FreeSWITCH, Avaya, Cisco, you name it
✅ 5-minute setup - Just like adding a new desk phone
How It Works:
Your PBX sees the AI as just another extension (like ext. 101)
↓
Patients call your main number → Your PBX routes to the AI extension
↓
AI answers, handles FAQs, and books appointments
↓
If needed, AI transfers to ext. 102 (front desk) or ext. 103 (billing)
↓
Your staff picks up - no external phone numbers involved!
Setup Steps:
Step 1: Identify Available Extension
In your PBX admin panel:
Find an unused extension number (e.g., 101, 200, 999)
Note your PBX domain (e.g.,
pbx.yourpractice.comor IP address)Create extension credentials (username/password)
Step 2: Register Extension in VoiceInfra
In the VoiceInfra dashboard, click "Phone Numbers" → "Add Extension"
Fill in the extension details:
Extension Number: 101
Domain: pbx.yourpractice.com
Username: ai-receptionist
Password: [your SIP password]
Proxy: pbx.yourpractice.com (usually the same as the domain)
Transport: TCP (or UDP - match your PBX)
Friendly Name: Dental AI Receptionist
Click "Create Extension"
Step 3: Verify Registration
VoiceInfra automatically registers with your PBX. You should see:
✅ Status: "Registered" (green indicator)
✅ Extension appears in your PBX's registered endpoints list
Step 4: Assign AI Agent
Click on your registered extension
Under "Assigned Agent", select "Dental Front Desk Assistant"
Configure settings:
Inbound Calls: Enabled
Outbound Calls: Enabled (for appointment reminders)
Call Recording: Enabled
Click "Save"
Step 5: Configure Call Routing in Your PBX
Now route calls to your AI extension. Common setups:
Setup 1: After-Hours Routing
9 AM Business Hours (9 AM-5 PM) → Front desk phones After Hours → Extension 101 (AI)
Setup 2: Overflow Routing
The main number rings the front desk for 20 seconds If no answer → Extension 101 (AI)
Set up 3: Direct AI Line
Main number: (555) 123-4567 → Front desk AI direct line: (555) 123-4568 → Extension 101 (AI)
Step 6: Configure Transfer Numbers
Since you're using PBX extensions, update your call transfer settings (from Step 6) to use extension numbers instead of E.164 phone numbers:
Transfer to Front Desk: ext. 102 Transfer to Billing: ext. 103 Transfer to Manager: ext. 104
The AI will transfer calls internally within your PBX - no external calls needed!
Step 7: Test the Extension
From your mobile phone, call your office number
Your PBX should route to the AI extension
AI answers and handles the call
Try saying: "I need to speak with billing."
AI should transfer to ext. 103 (or whatever you configured)
✅ Checkpoint: Your AI is now a full member of your PBX system!
7.3 Option B: Connect Existing Number (Twilio/Custom SIP)
If you don't have a PBX or prefer to use a direct phone number:
For Twilio Users:
In VoiceInfra Dashboard:
Click "Phone Numbers" → "Add Phone Number"
Select "Twilio" from the wizard options
Enter your Twilio Account SID and Auth Token
Select the phone number(s) you want to import
Assign your AI agent
Click "Import"
For Custom SIP Providers:
In VoiceInfra Dashboard:
Click "Phone Numbers" → "Add Phone Number"
Select "Custom Configuration"
Choose "Phone Number"
Enter your SIP trunk details (provided by your carrier)
Assign your AI agent
Click "Create"
7.4 Option C: WhatsApp Business Calling (Bonus)
VoiceInfra supports WhatsApp Business calling - patients can call your AI via WhatsApp!
Setup:
In VoiceInfra Dashboard:
Click "Phone Numbers" → "Add Phone Number"
Select "WhatsApp Business" from the wizard options
Enter your WhatsApp Business phone number
Enter your Meta Business API Phone Number ID
Enter your Access Token
Review and click "Integrate"
Assign your AI agent to the WhatsApp number
Use case: International patients, younger demographics who prefer WhatsApp
7.5 Test Your Connection
Make a test call:
Call your configured number/extension
AI should answer with the first message
Try: "What are your office hours?"
Try: "I'd like to book a cleaning."
Try: "I need to speak with someone about billing."
Check call logs:
Go to "Call Logs" in VoiceInfra
Verify the call was received and handled
Review transcript for accuracy
✅ Checkpoint: Your AI assistant is now live and answering calls!
Step 8: Test Everything (10 minutes)
Let's run through a complete test to make sure everything works.
8.1 Test Scenario 1: New Patient Booking
Call your number and simulate:
AI: "Thank you for calling [Practice Name]. This is our AI assistant..."
You: "Hi, I'd like to schedule a cleaning"
AI: "I'd be happy to help! Can I get your phone number?"
You: [Provide phone number]
AI: [Looks up patient] "Hello [Name]! What day works best for your cleaning?"
You: "Next Thursday"
AI: [Gets available slots] "I have these times available..."
You: "2:00 PM works"
AI: [Books appointment] "Perfect! Your cleaning is confirmed for Thursday at 2:00 PM."
Check in Open Dental:
Verify the appointment appears in the schedule
Verify patient information is correct
Verify time and provider are correct
8.2 Test Scenario 2: FAQ Questions
Call and ask:
"What are your office hours?"
"Do you accept Delta Dental insurance?"
"How much is a cleaning?"
"Where are you located?"
Verify:
AI answers correctly from the knowledge base
Responses are natural and conversational
Information matches your FAQ document
8.3 Test Scenario 3: Reschedule Appointment
Call and say:
You: "I need to reschedule my appointment."
AI: "I can help with that. What's your phone number?"
You: [Provide number]
AI: [Looks up] "I see you have a cleaning on [date] at [time]. When would you like to move it to?"
You: "The following week, same time"
AI: [Gets slots and reschedules] "Done! Your appointment is now [new date] at [time]."
Check Open Dental:
The old appointment is updated
New date/time is correct
8.4 Test Scenario 4: Call Transfer
Call and say:
You: "I have a question about my bill." AI: "I'll connect you with our front desk team, who can help with billing. Please hold." [Transfer happens]
Verify:
Transfer happens smoothly
Staff receive context about the call
Patient doesn't get disconnected
8.5 Review Call Logs
In the VoiceInfra dashboard, go to "Call Logs"
Review your test calls:
Check transcripts for accuracy
Verify functions were called correctly
Check call duration and quality
8.6 Check Call Analytics
Go to "Analytics" tab:
Total calls handled
Average call duration
Successful bookings
Transfer rate
Common questions asked
✅ Checkpoint: Everything is working! Your AI receptionist is ready for real patients.
Step 9: Monitor and Improve (Ongoing)
Your AI is live, but the work doesn't stop here. Here's how to continuously improve it.
9.1 Review Call Transcripts Daily (First Week)
For the first week, review every call:
Go to "Call Logs" daily
Read transcripts of all calls
Look for:
Questions the AI couldn't answer
Incorrect information given
Awkward conversations
Missed opportunities to help
9.2 Update Knowledge Base
When you find questions the AI couldn't answer:
Add them to your FAQ document
Re-upload to Knowledge Base
Test to verify AI now knows the answer
Common additions:
Specific procedure questions
Insurance coverage details
Pre-appointment instructions for specific treatments
Parking and directions
Forms patients need to bring
9.3 Refine System Prompt
Based on call reviews, update your system prompt:
Add specific phrases:
When the patient asks about [specific situation], say [specific response]
Add handling for edge cases:
If the patient mentions a pain level above 7/10, immediately offer an emergency appointment or transfer
9.4 Set Up Call Recording Review
Enable call recording for quality assurance:
Go to agent settings → "Call Recording"
Enable "Record All Calls"
Set retention: 30 days
Schedule a weekly review with your team
9.5 Monitor Key Metrics
Track these metrics weekly:
Efficiency Metrics:
% of calls handled without transfer
Average call duration
Calls handled after hours
Business Metrics:
Appointments booked by AI
Missed call reduction
Patient satisfaction (ask during next visit)
Quality Metrics:
Transfer rate (should be <30%)
Booking accuracy (verify in Open Dental)
Patient complaints
9.6 Train Your Staff
Make sure your front desk knows:
AI is handling calls - They'll receive fewer routine calls
How transfers work - What context they'll receive
How to check AI bookings - Verify appointments in Open Dental
Who to contact - If AI makes a mistake or needs adjustment
Hold a team meeting:
Demonstrate how the AI works
Play sample calls
Answer questions
Get feedback
9.7 Gradual Rollout (Recommended)
Don't switch everything at once:
Week 1: After-hours calls only
Week 2: Add lunch hours (12–1 PM)
Week 3: Add morning overflow (8–9 AM)
Week 4: Full deployment during busy times
This lets you catch issues before they affect too many patients.
✅ Checkpoint: You're now continuously improving your AI receptionist!
Troubleshooting Common Issues
Issue 1: AI Can't Find the Patient in Open Dental
Symptoms:
AI says, "I can't find your record."
Patient insists they're in the system.
Solutions:
✅ Check phone number format (must match Open Dental exactly)
✅ Try searching by name instead of phone
✅ Verify API permissions include "Read Patients"
✅ Check if the patient has multiple phone numbers in Open Dental
Fix: Update your lookup function to search by both phone AND name.
Issue 2: Appointments Not Showing in Open Dental
Symptoms:
AI confirms booking
The appointment doesn't appear in the Open Dental schedule
Solutions:
✅ Check the API key has "Write Appointments" permission
✅ Verify ProvNum and OpNum are valid
✅ Check date/time format is correct ("YYYY-MM-DD HH:mm:ss")
✅ Review function call logs for errors
Fix: Check "Call Logs" → "Function Calls" tab for error messages.
Issue 3: AI Gives Wrong Information
Symptoms:
AI provides incorrect hours, pricing, or services
Information is outdated
Solutions:
✅ Update your FAQ document
✅ Re-upload to Knowledge Base
✅ Verify document is linked to the agent
✅ Clear knowledge base cache (Settings → Clear Cache)
Fix: Always update the knowledge base when practice information changes.
Issue 4: Call Quality Issues
Symptoms:
Choppy audio
Delays in responses
Dropped calls
Solutions:
✅ Verify your phone system has sufficient balance/credits
✅ Test from a different phone/location
✅ Contact VoiceInfra support for server-side issues
Issue 5: AI Transfers Too Often
Symptoms:
Most calls get transferred
AI says "I can't help with that" too frequently
Solutions:
✅ Expand knowledge base with more FAQs
✅ Update system prompt with more specific instructions
✅ Add more function capabilities
✅ Review transcripts to identify common transfer reasons
Fix: Aim for <30% transfer rate. If higher, your AI needs more training.
Issue 6: Patients Prefer Human
Symptoms:
Patients ask to speak with a person immediately
Negative feedback about AI
Solutions:
✅ Update first message to be more welcoming
✅ Offer human option upfront: "Press 0 to speak with our front desk."
✅ Make AI voice more natural (try different voice models)
✅ Ensure AI is helpful, not frustrating
Remember: Some patients will always prefer humans. That's okay! The AI handles the overflow.
Other Use Cases: Beyond Dental Practices
This same setup works for other appointment-based businesses. Just adapt the knowledge base and functions:
Medical Clinics
Replace Open Dental with your EHR (Epic, Cerner, Athenahealth)
Include insurance verification
Handle prescription refill requests
Veterinary Clinics
Pet information instead of patient info
Emergency triage for sick animals
Boarding and grooming appointments
Medication refills
Salons & Spas
Service menu (haircuts, color, massage, facials)
Stylist preferences
Package bookings
Retail product questions
Law Firms
Consultation scheduling
Case type screening
Document collection
Billing inquiries
HVAC/Plumbing Services
Emergency dispatch
Service appointment scheduling
Quote requests
Technician routing
The pattern is the same:
Create an AI agent
Add an industry-specific knowledge base
Connect to your scheduling system API
Set up call transfers
Go live
Next Steps: What to Do After This Tutorial
Congratulations! You've built a fully functional AI phone assistant for your dental practice. Here's what to do next:
Immediate (This Week)
Run test calls with your team
Update the FAQ document with any missing information
Set up call recording and review process
Train front desk staff on how AI works
Start with after-hours calls only
Short-term (This Month)
Gradually expand to busy hours
Review call transcripts weekly
Add more FAQs based on common questions
Set up appointment reminder outbound calls (optional)
Integrate with your website (add "Call Us" button)
Long-term (Next 3 Months)
Add SMS appointment confirmations
Set up automated recall reminders
Integrate with the patient portal
Add post-appointment follow-up calls
Expand to handle insurance verification
Advanced Features to Explore
Outbound Calling: AI calls patients for appointment reminders
SMS Integration: Text confirmations and reminders
Multi-language Support: Spanish, Mandarin, etc.
Sentiment Analysis: Flag unhappy patients for follow-up
CRM Integration: Sync with your marketing platform
Analytics Dashboard: Track ROI and patient satisfaction
Frequently Asked Questions
How much does this cost?
AI Assistant Cost:
Average cost per call: $0.32-0.42 (5-minute appointment scheduling call)
Typical dental practice: 75 calls/day = 2,250 calls/month
Monthly AI cost: $720-945
Additional Costs:
Phone number: $1-5/month (if using Twilio)
Open Dental API: Included with Open Dental subscription
PBX extension: $0/month (if using existing PBX - recommended)
Cost of Human Receptionist:
Salary + benefits: $3,800-4,900/month
Can only work 8 hours/day, 5 days/week
Requires vacation, sick days, and training
Monthly Savings: $3,000-4,000/month Annual Savings: $36,000-48,000/year
ROI: 80-85% cost reduction
Additional Benefits:
24/7 availability (no overtime pay)
Zero missed calls = more appointments booked
Consistent quality (no sick days, vacations, turnover)
Scales instantly during busy periods
Frees up human staff for higher-value tasks
Will patients know they're talking to AI?
Yes, and that's a good thing. Your AI introduces itself as "our AI assistant" in the first message. Transparency builds trust.
Most patients don't care if it's AI or human, as long as:
They get their questions answered
They can book appointments easily
They can reach a human if needed
What if the AI makes a mistake?
The AI will make mistakes, especially at first. That's why you:
Review call transcripts regularly
Update the knowledge base frequently
Have an easy transfer to humans
Monitor bookings in Open Dental
Pro tip: Enable call recording so you can review and learn from mistakes.
Can it handle emergencies?
Yes! Configure your system prompt to recognize emergency keywords:
"Severe pain"
"Knocked out tooth"
"Swelling"
"Bleeding won't stop"
When detected, AI should:
Offer a same-day emergency appointment
OR immediately transfer to the front desk
OR provide an after-hours emergency number
How long does setup take?
This tutorial: 30-45 minutes
Testing and refinement: 2-3 hours
Staff training: 1 hour
Total: About half a day
Do I need technical skills?
No! If you can use Open Dental, you can do this. The tutorial walks you through every step.
Can it handle multiple languages?
Yes! OpenAI Realtime supports multiple languages. Update your system prompt:
You can communicate in English and Spanish. If a patient speaks Spanish, respond in Spanish.
What if my internet goes down?
Calls will fail if your internet is down. Solutions:
Use cloud-hosted Open Dental (recommended)
Set up a failover to a cell phone
Configure backup transfer number
How do I measure success?
Track these metrics:
Calls handled: Should increase over time
Transfer rate: Should decrease (target <30%)
Appointments booked: Track daily
Missed calls: Should approach zero
Patient satisfaction: Ask during visits
Conclusion: You Did It! 🎉
You've just built a sophisticated AI phone assistant that:
✅ Answers patient questions 24/7
✅ Looks up patient records in Open Dental
✅ Books and reschedules appointments automatically
✅ Transfers complex requests to your staff
✅ Saves your practice thousands per month
What you've accomplished:
Reduced missed calls to nearly zero
Freed up your front desk for higher-value tasks
Enabled 24/7 appointment booking
Improved patient experience
Increased revenue through better call handling
Remember:
Start small (after-hours only)
Review and improve weekly
Train your staff
Be patient with the learning curve
Your AI assistant will get better every day as you refine it based on real calls.
Ready to Get Started?
Sign up for VoiceInfra:voiceinfra.ai/signup
Questions about this tutorial? Email us at hello@voiceinfra.ai
Built your AI assistant? We'd love to hear about it! Share your success story with us.
Last updated: November 25, 2025Tutorial version: 1.0Compatible with: VoiceInfra, Open Dental 21.1+